
Christmas Name Tags for Drink Glasses and Table
Every glass gets a name. Every guest gets a place. One tag does both.
Make your table classy and keep drinks straight all season. This set gives you dual-purpose customized name tags: clip-on tags sized to your exact glass rim, and place-setting tags with neat Gridfinity-based holders. Print the names once — the same tag clips to a glass and slides into a holder, so your table looks consistent from cocktails to dessert.
7 print profiles included · Free download · Standard Digital File License
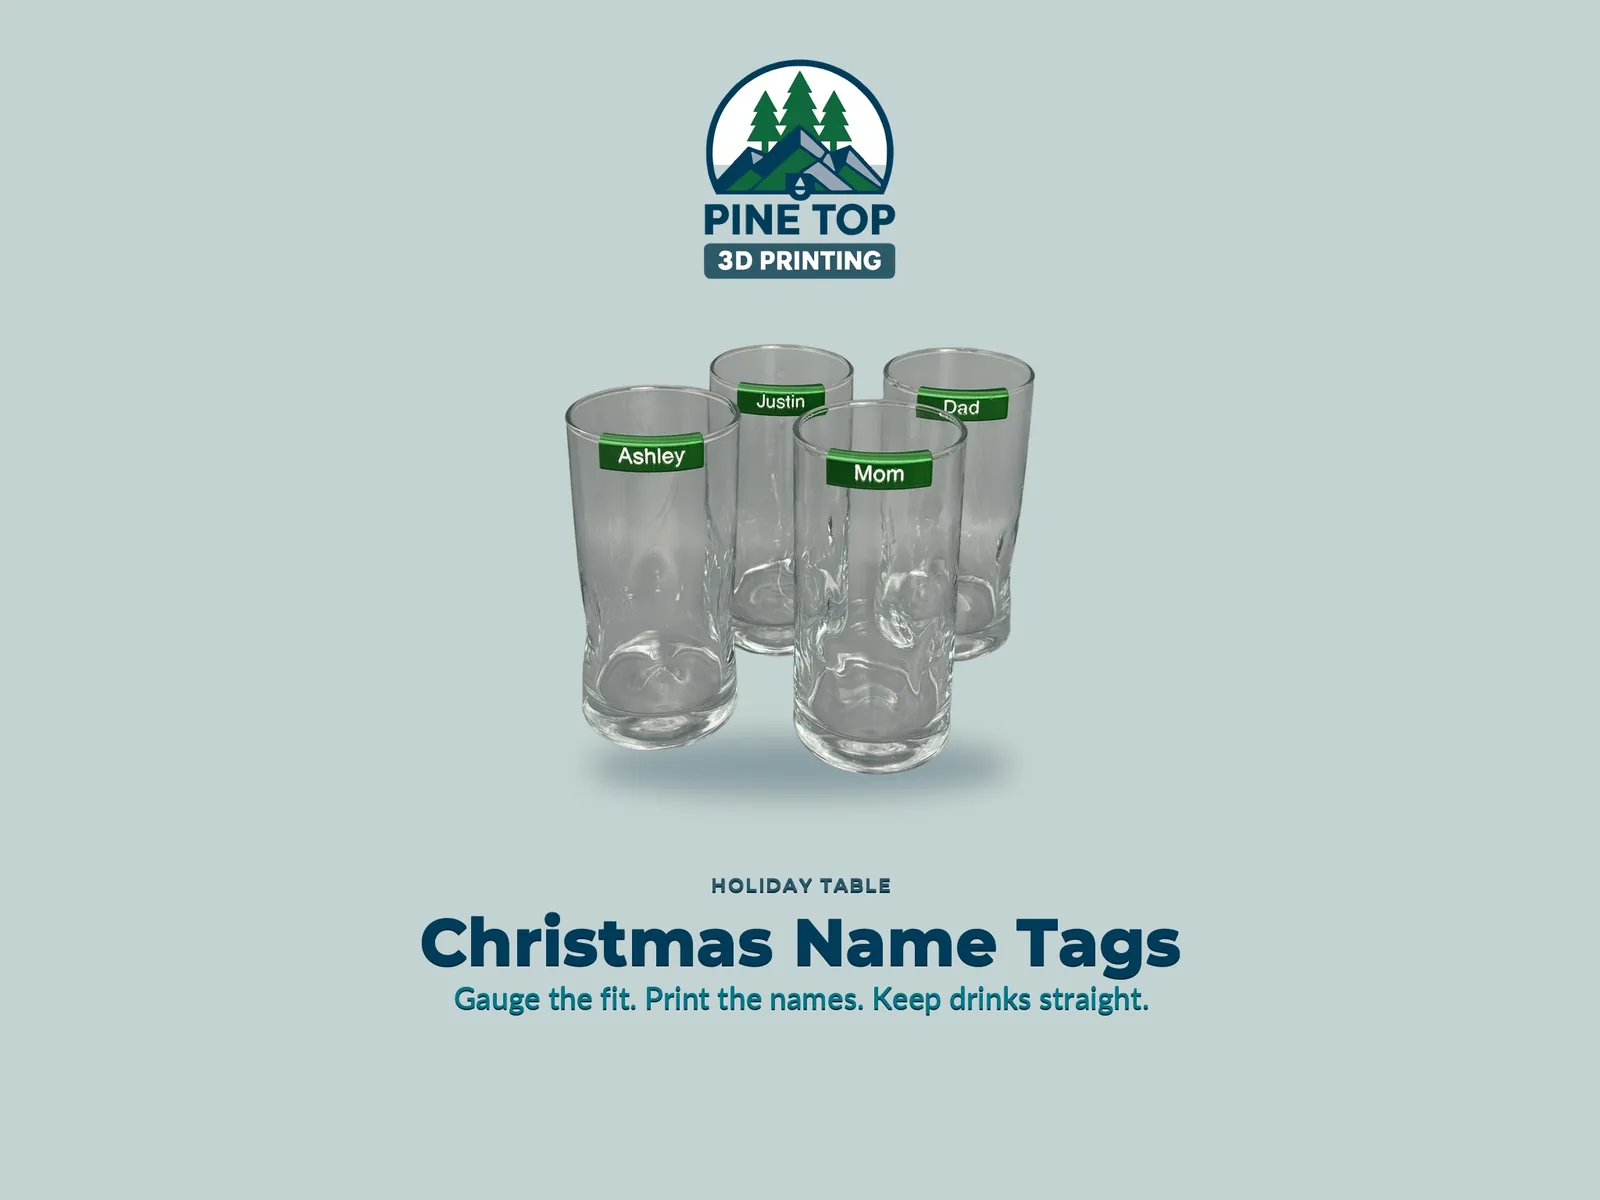
One tag, two jobs
Each name is printed once, on a nameplate that rides a curved clip. During cocktails, the tag clips to the glass rim so nobody loses their drink. At dinner, the same tag slides into a place-setting holder with a Gridfinity-compatible base — so the table stays consistent from the first toast to the last dessert.
Between gatherings, the whole family's set stores in a printed rack: a 10-tag rack, or a 28-tag rack on a 3x4 Gridfinity base that drops straight into a Gridfinity drawer.
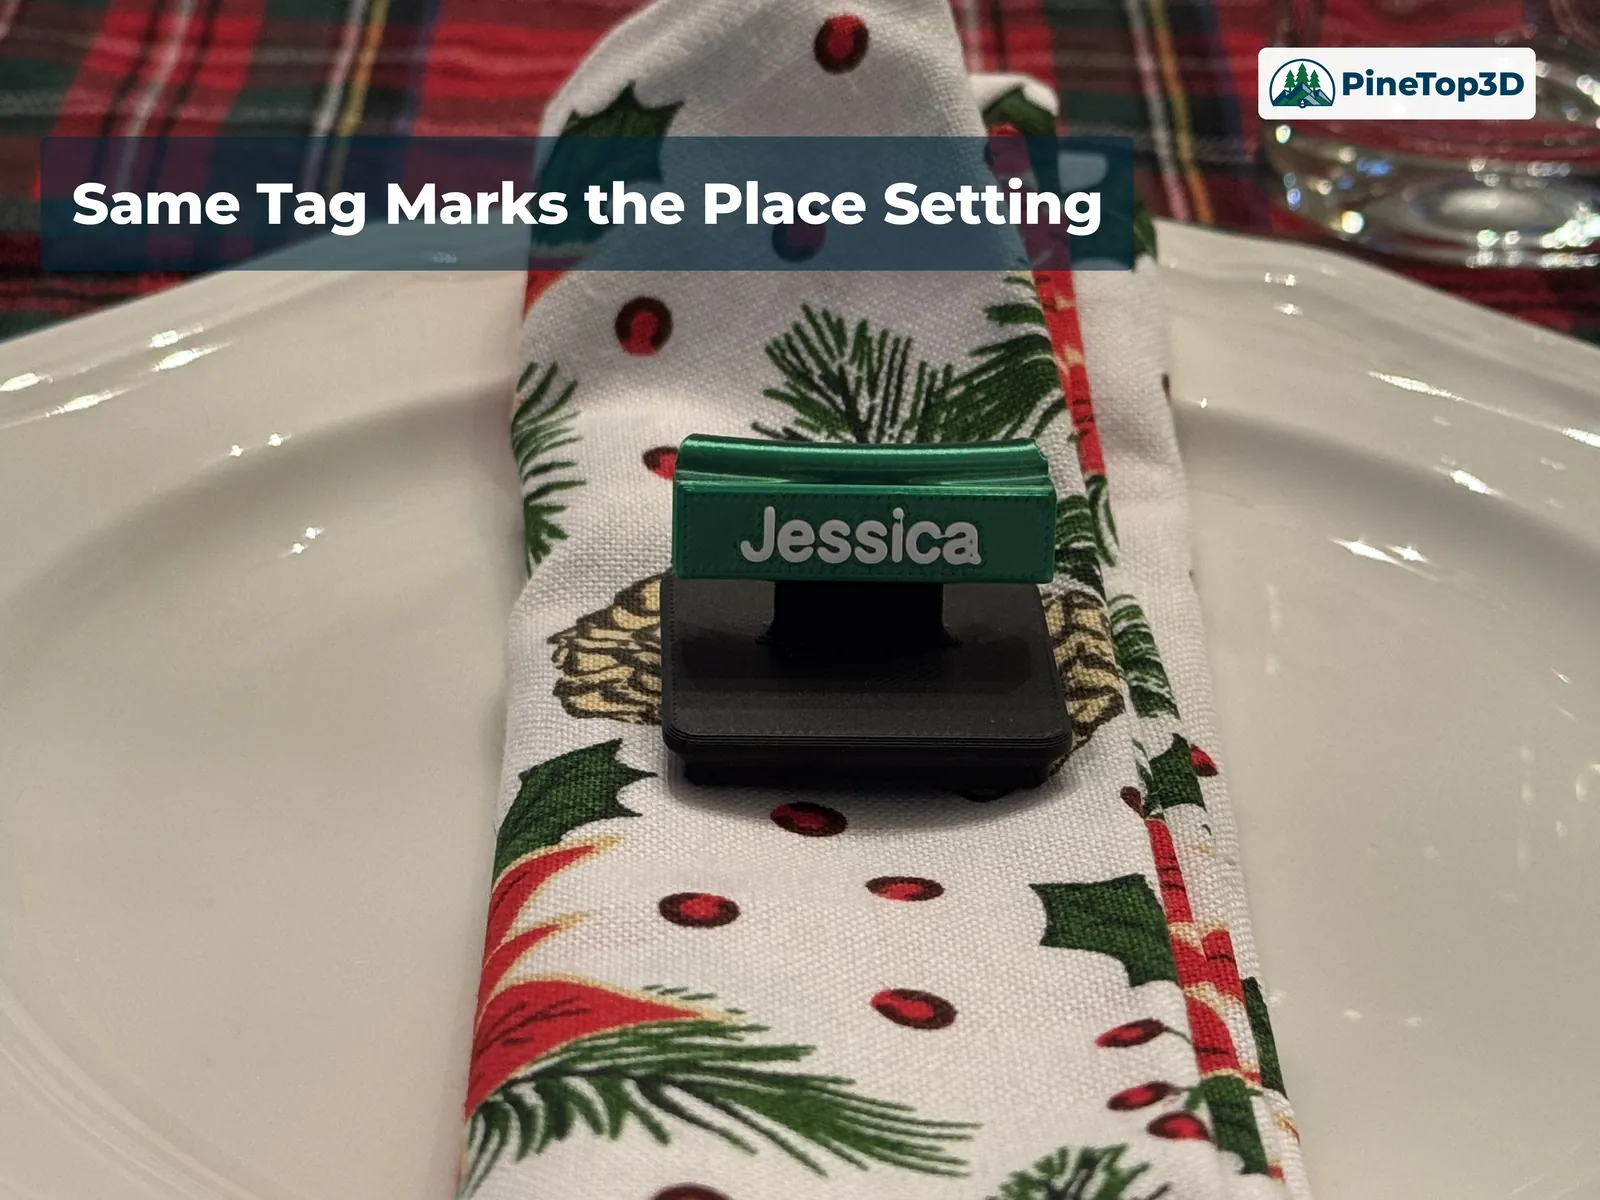
How the fit system works
Glass rims vary widely — sloping sides, different diameters, different lip thicknesses. Guessing produces tags that slip or crack. This model solves it with a gauge system.
-
Print the gauge tag plate first
One plate, about 2.6 hours. Each gauge is labeled: the first number is the glass outer diameter, the second is the rim thickness (75-3.25 = 75 mm diameter, 3.25 mm rim).
-
Try the gauges on your actual glasses
Note the number of the gauge that clips on the way you like.
-
Print tags in that size
Open the tag plate in your size, copy-paste as many tags as you need, and print. The profiles include large 10 mm brims to stabilize the tags — place tags so the brims overlap after slicing for best results.
-
Print nameplates
Choose the AMS profile, or the non-AMS profile with a filament-swap pause built in — either way, the raised letters print in a contrasting color you choose.
-
Edit the names in Bambu Studio
Full click-by-click instructions below — it's a built-in text edit, no CAD needed.
-
Attach each nameplate to a tag
A dab of glue is all it takes — the printed index ridge aligns the flat nameplate on the curved clip automatically.
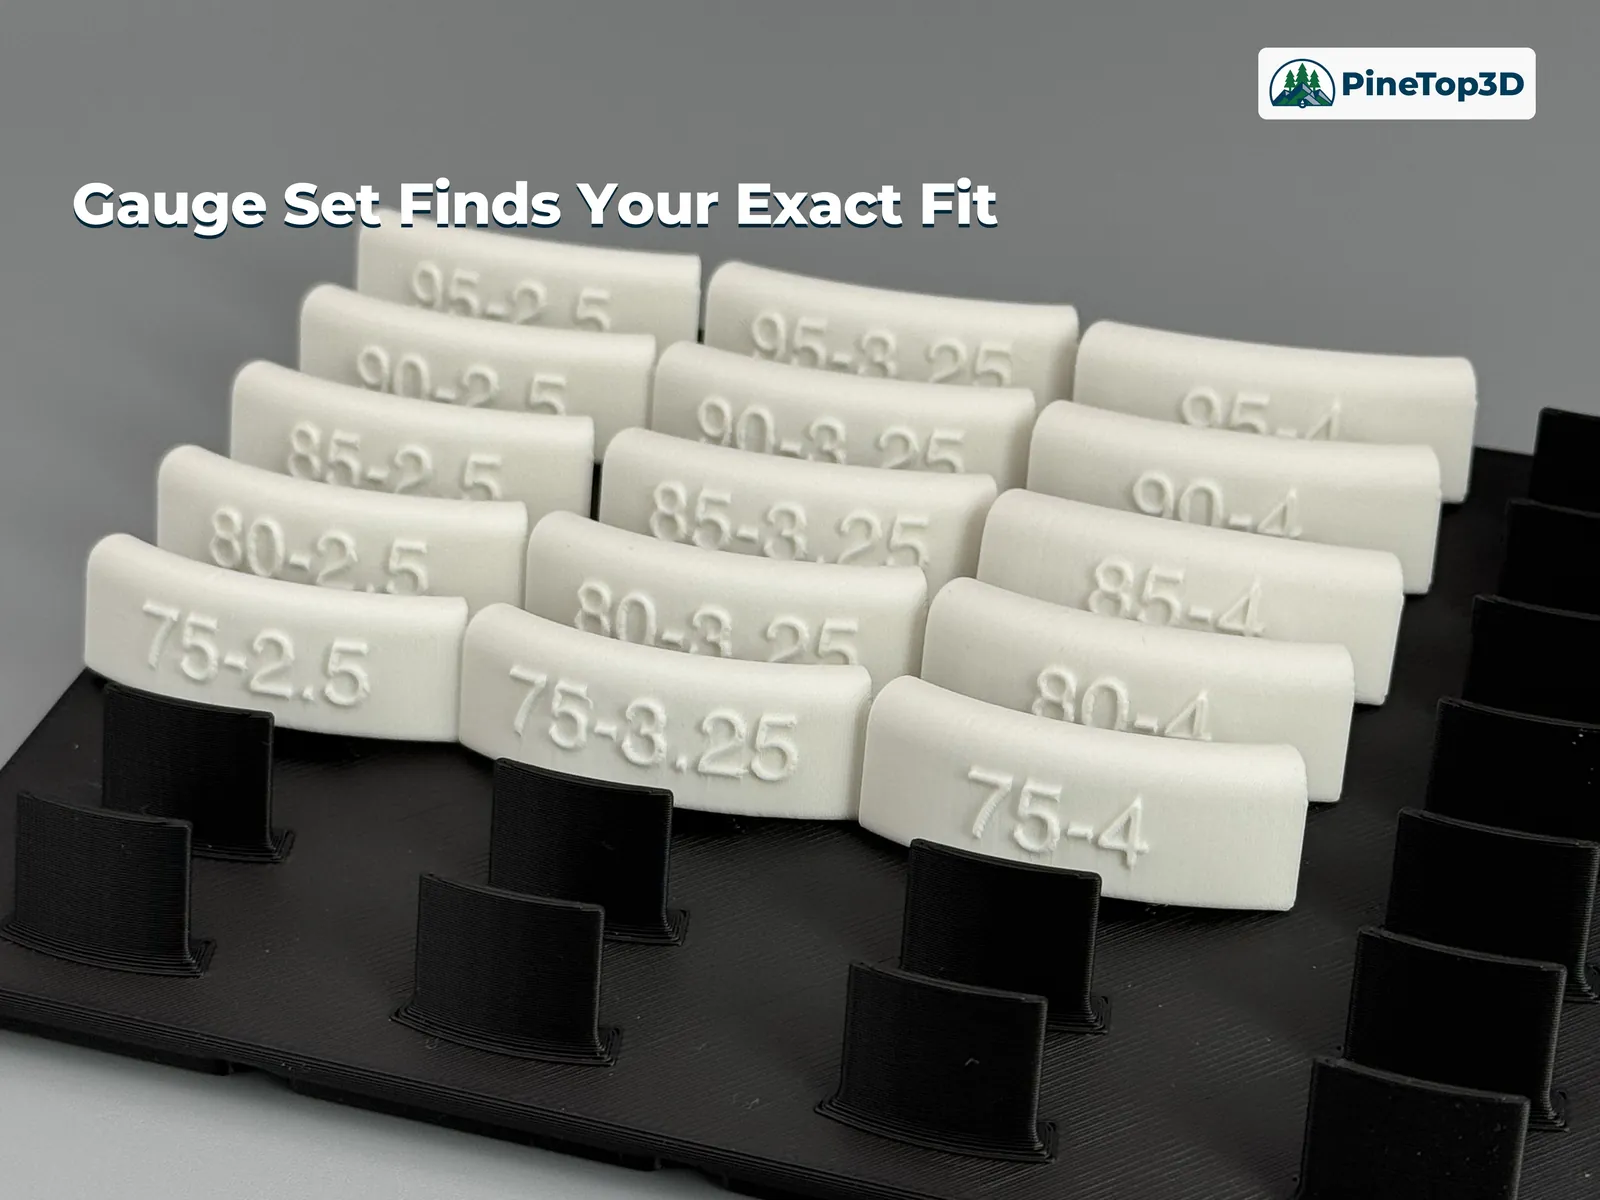
The gauges and profiles cover most common glasses. For anything else, the MakerWorld Customize feature generates a new tag from your glass's outer diameter and rim thickness — for relatively flat-sided glasses, try a larger outer diameter. The nameplates fit any tag size.
Editing the names in Bambu Studio
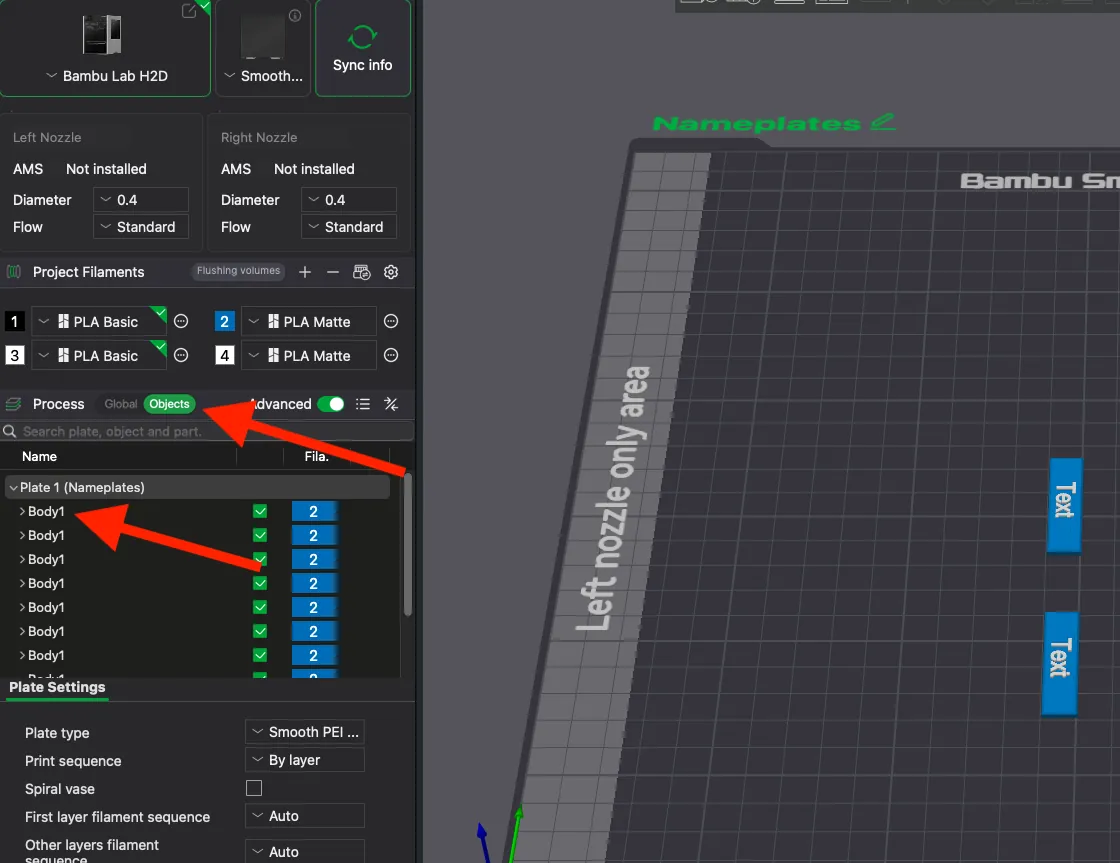
The name text is a Bambu Studio text object — edit it right in the slicer, then copy-paste a nameplate per guest.
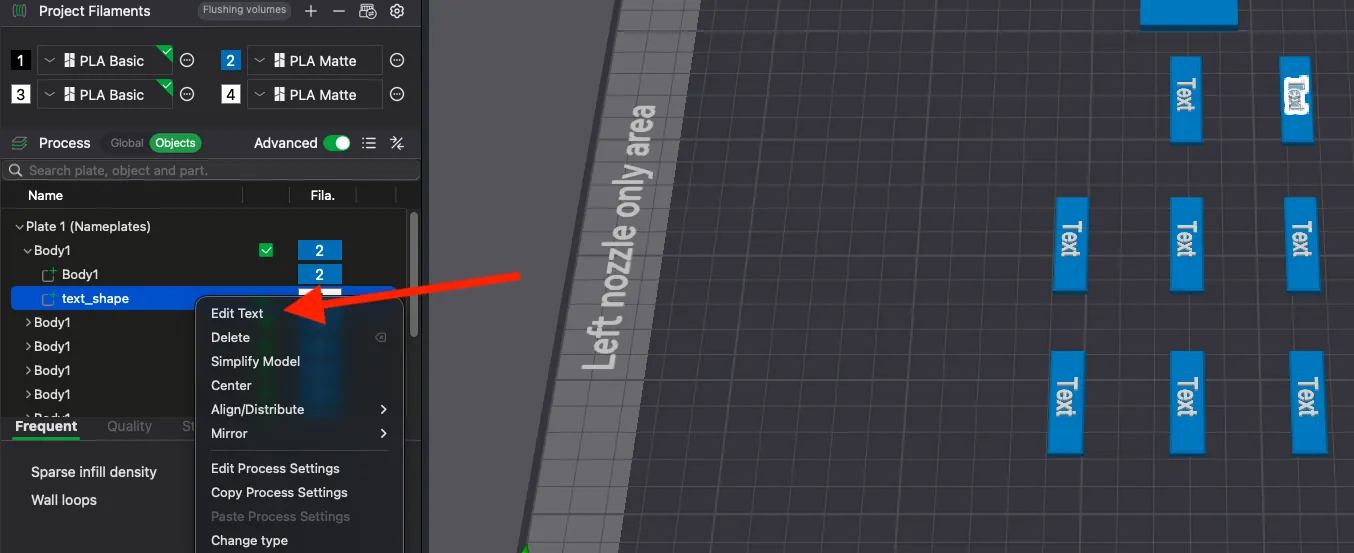
- Highlight the nameplate and select Objects in the left panel.
- Expand the nameplate body (caret at the far left) and click its text_shape.
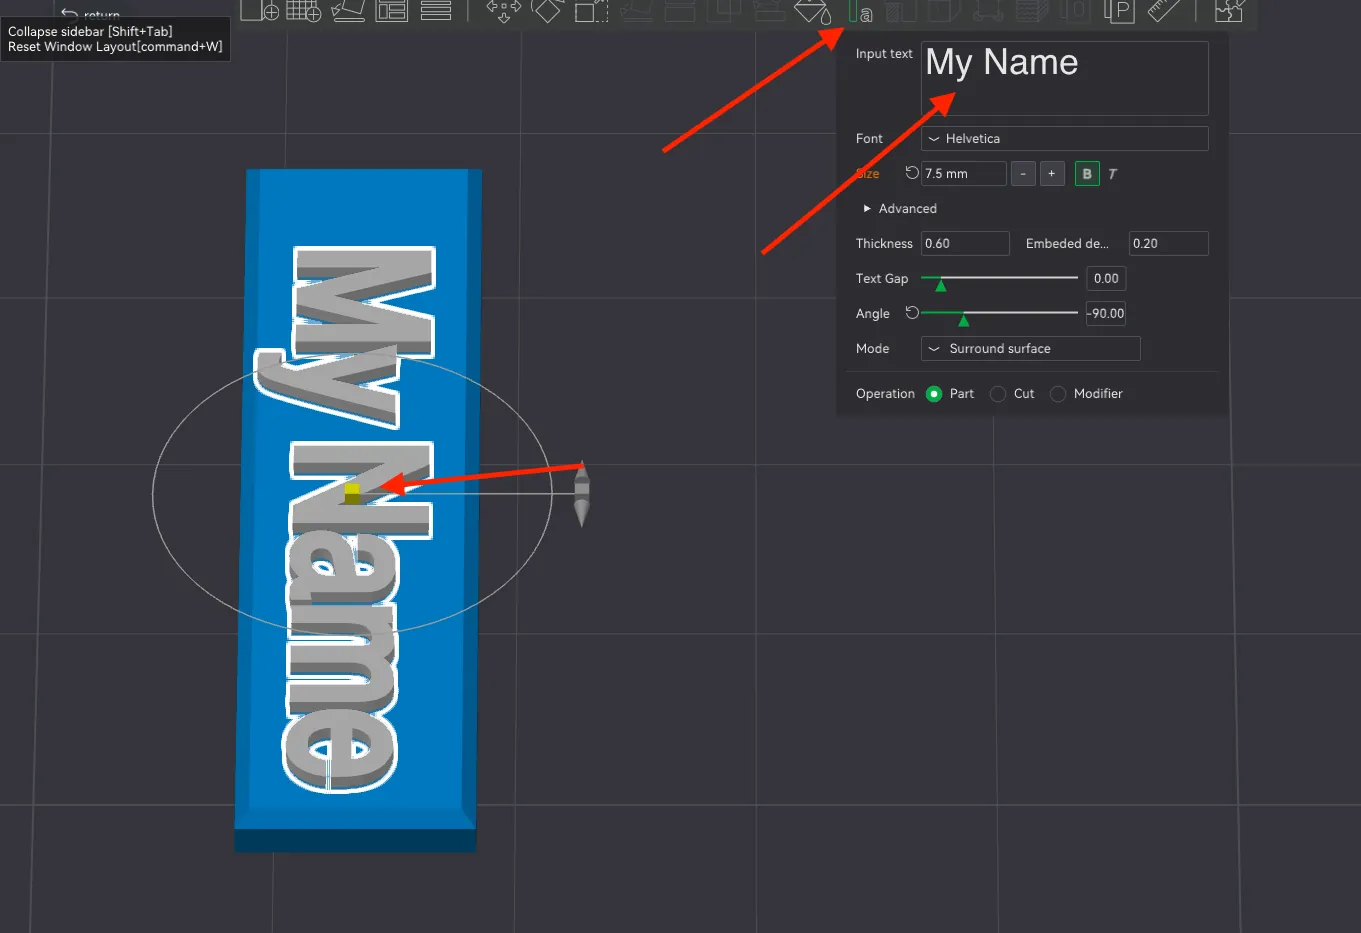
- Right-click the highlighted text_shape → Edit Text.
- Replace the text with the name you want.
- Center the text by dragging the yellow square at its center (or select center in the drop-down menu).
- Close the text tool from the top menu bar, copy-paste additional tags, and print.
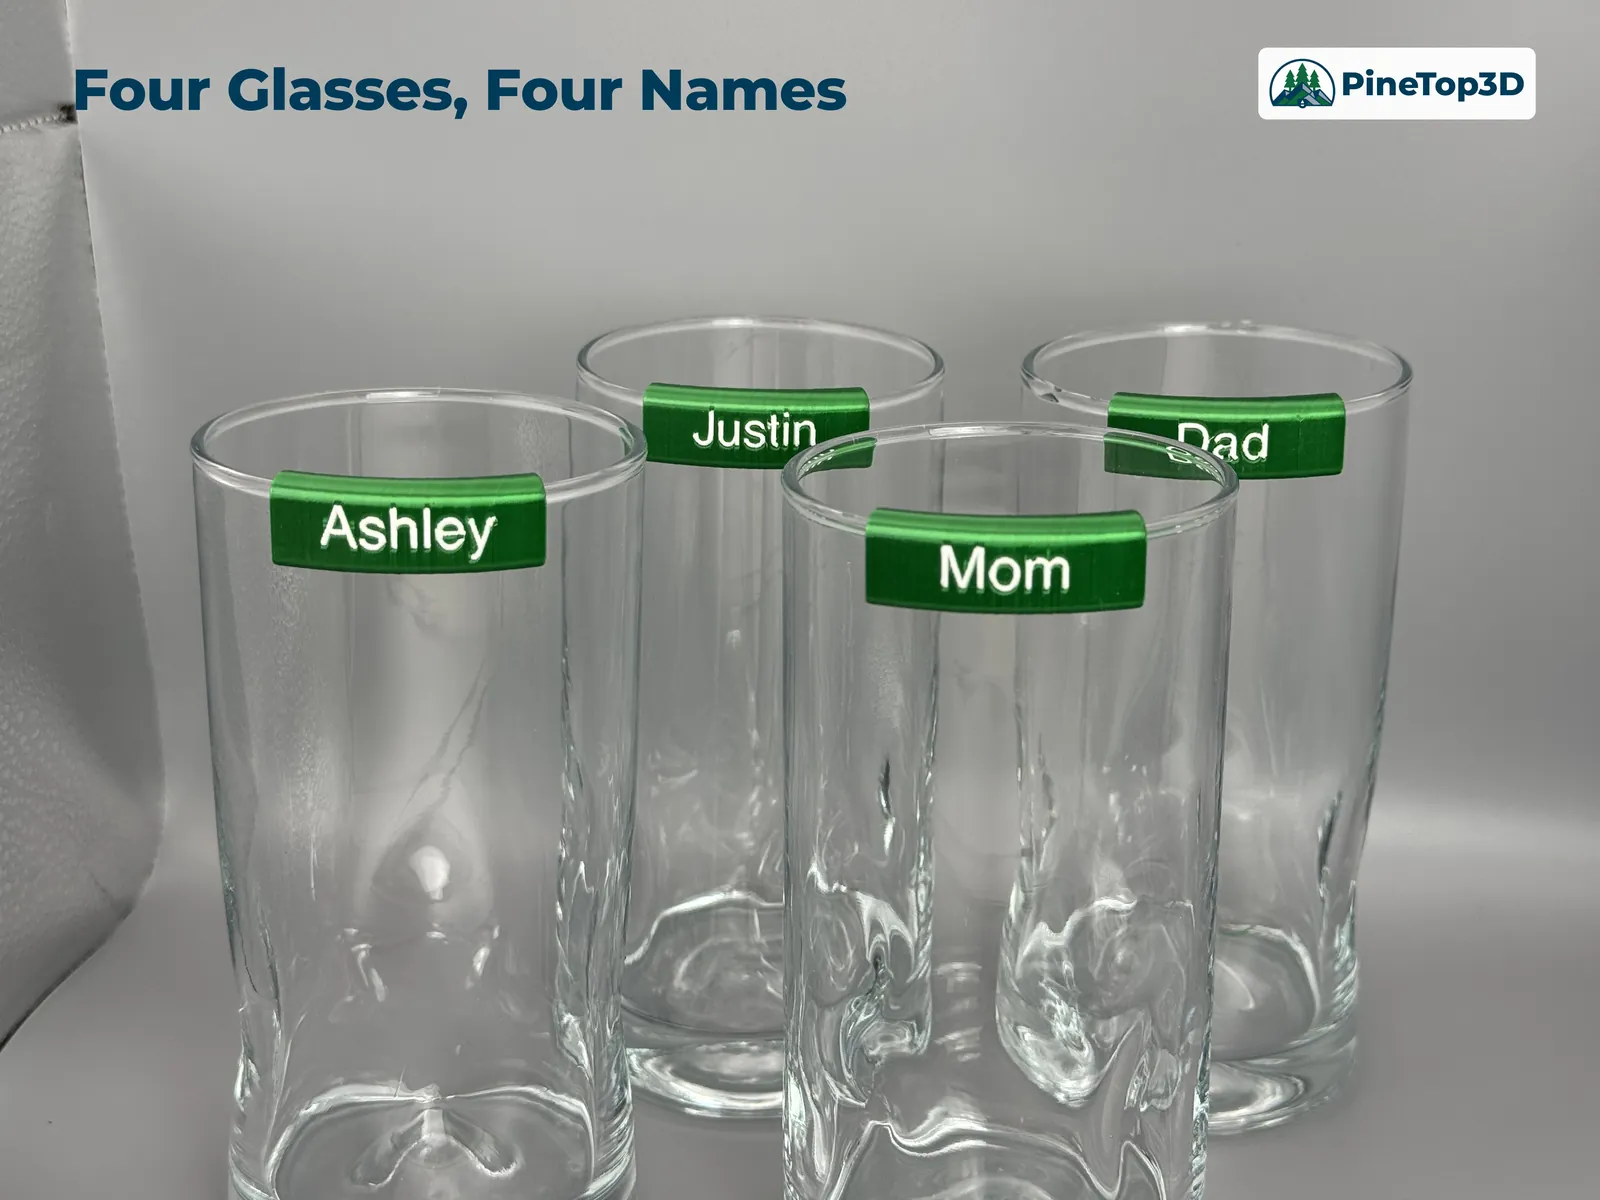
Pick any filament combination that matches your décor — the pictured tags are Silk+ Candy Green with Matte Ivory White raised letters.
The Thanksgiving problem that started it
My daughter and son-in-law were hosting a large Thanksgiving dinner and knew exactly what would happen: cocktail and water glasses set down around the house and stranded, with nobody sure which was whose. They asked for a way to put a name on each glass. We talked through a number of solutions, tested a few, and settled on the original clip-on tag design.
Then came the sizing problem. Measurements alone — glass diameter and rim thickness — turned out to be a bad predictor of a good fit, thanks to thickened rims, sloping sides with varying diameters, and other glass-to-glass quirks. The answer was a set of quick-printing gauges: clip them on the actual glasses, find the one that fits the way you like, and only then print the detailed, more time-consuming named tags. That gauge-first workflow has been the backbone of the design ever since — the rest of the story is in the Fusion section below.
Why this is a two-piece design
The original combo-tag design (now retired) worked well and looked great — but the name detail was baked into the curved tag itself. Getting that detail meant small layer heights and an orientation that forced color changes on almost every layer. Only dual-nozzle machines had a realistic chance of printing them in reasonable time, and even for those machines the prints were lengthy.
The fix was splitting the jobs. In the current two-piece design, the fit lives in the curved clip — one color, printed thin and stable with its brim — and the name lives on a small flat nameplate, where the raised letters need exactly one color change: a single automatic pause at the letter layer (or an AMS swap). A nameplate plate prints in about 23 minutes instead of hours, on any printer. A printed index ridge aligns the flat nameplate on the curved clip at glue-up, so the two pieces go together straight every time. With that, the original model was retired.
- Two-parameter fit — glass outer diameter + rim thickness drive every gauge, every tag size, and the MakerWorld customizer.
- Detail split from fit — names on a flat nameplate, fit in a curved clip; each piece prints the way it wants to.
- One color change — a single pause (or AMS swap) at the letter layer replaces near-every-layer changes.
- Index ridge — self-aligns the nameplate on the curved clip at glue-up.
- Gauge-first workflow — a 2.6 h gauge plate protects the longer tag prints from bad fits.
Seven print profiles, ready to slice
| Profile | Plates | Filament |
|---|---|---|
| Gauge Tags (print this first!) | 1 | 44 g |
| Tags — separate plate for each size | 15 | ~50 g |
| Nameplates — with AMS / no AMS | 1 | 9 g |
| Individual place-setting holder | 1 | 26 g |
| Name tag rack — holds 10 | 1 | 29 g |
| Name tag rack — holds 28, 3x4 Gridfinity base | 1 | 86 g |
Seven profiles in all — the nameplates ship as separate AMS and no-AMS profiles. Works on any printer: no dual nozzle required, and the no-AMS nameplate profile pauses automatically for the letter-color swap.
- Material: PLA — pick any color combination that matches your décor.
- Tags print at 0.12 mm with 3 walls and a 10 mm outer brim — the brim keeps these thin curved parts stable, so don't remove it.
- Racks and holders print at 0.24 mm — no supports anywhere in the set.
- Filament swap: the no-AMS nameplate profile pauses automatically at the letter layer.
- Hand-wash only — PLA isn't dishwasher safe.
- Not for children's cups unless they're old enough to keep tags out of their mouths.
- Keep liquid levels below the tag — the tags aren't intended to contact your beverage.
Gauge once, print the names, and nobody loses their glass this Christmas.
Dual-purpose name tags fitted to your exact glasses, with holders and racks to match. The download is free on MakerWorld — and a download helps support the shop.
Download free on MakerWorld